System and procedure information checked: November 1, 2026 (Japan time). This guide follows published official instructions for purchases from November 1, 2026. It is not a report of testing the new system at an airport after launch.
If your airport tax-free procedure stalls, keep the goods with you before bag drop. First find your departure-terminal location and choose the kiosk or VJW steps below. If something goes wrong, identify whether it concerns a purchase record, customs confirmation or payment. Our Japan tax-free shopping guide covers the overall process.
- Have the passport and goods ready
- Choose your departure airport and terminal
- At the kiosk: read the result after scanning your passport
- Using your phone: VJW needs the designated airport Wi-Fi
- A missing record does not explain the cause
- Match the status to the next step
- Use the kiosk if the online route is difficult
- Choose the right contact
- Explain these situations directly
- Sources
Have the passport and goods ready
Customs must be able to inspect your tax-free goods. Keep receipts available too: officers may ask to see them, but receipts cannot replace the goods.
Use the official airport and seaport maps to locate both the procedure terminal and inspection area at your departure terminal. Some locations lack a permanent kiosk or published map; ask the local customs office. With a domestic connection, confirmation is at your final departure airport from Japan. Check baggage arrangements with the airline in advance.
Once baggage has been checked in, it cannot be retrieved for the tax-free procedure. Complete any required customs confirmation before handing it over.
Choose your departure airport and terminal
Choose an airport, then expand its terminal information. These are customs procedure locations, not cash-refund machines. Complete the required procedure before security and bag drop. On the map, distinguish the kiosk symbol from the staffed inspection-area symbol.
Narita
Terminal 1, 4F
Open the official customs map: kiosks and inspection area
Terminal 2, 3F
Open the official customs map: kiosks and inspection area
Terminal 3, 2F
Open the official customs map: kiosks and inspection area
Haneda
Terminal 2, international area, 3F
Open the official customs map: kiosks and inspection area
Terminal 3, 3F
Open the official customs map: kiosks and inspection area
In Terminal 3, the kiosk and inspection area are separate locations. If inspection is required, find the inspection area too. Haneda Terminal 1 has no tax-refund facility; check your actual international departure terminal.
Kansai
Terminal 1, 4F
Open the official customs map: kiosks and inspection area
Terminal 2, 1F
Open the official customs map: kiosks and inspection area
Chubu Centrair
Terminal 1, 3F: in front of international check-in counters
Open the official customs map: kiosks and inspection area
Terminal 2, 2F: CIQ information corner beside the check-in counters
Open the official customs map: kiosks and inspection area
Terminal 1 inspection is near the kiosks in front of international check-in counters. In Terminal 2, the inspection area is on the way from the CIQ information corner toward security. Dedicated Wi-Fi is available near the kiosks, not necessarily throughout the building.
New Chitose
International terminal, 3F
Open the official customs map: kiosks and inspection area
Fukuoka
International terminal, 3F south side: in front of counters J–M
Open the official customs map: kiosks and inspection area
The inspection area is beside the kiosks. The airport lists 06:00–21:00 for both; dedicated Wi-Fi is available only in the international 3F departure lobby. Recheck the airport’s latest information before departure.
Naha
International area, 3F
Open the official customs map: kiosks and inspection area
Official information lists online VJW procedures for these seven airports, but this does not mean dedicated Wi-Fi covers each entire terminal. The maps do not establish full wireless coverage, waiting times or live equipment availability. For other airports or seaports, use the official map index linked above.
At the kiosk: read the result after scanning your passport
If you have consumed any consumables, or replaced your passport after shopping, first follow the customs-reporting guidance later in this article rather than simply proceeding through the steps below.
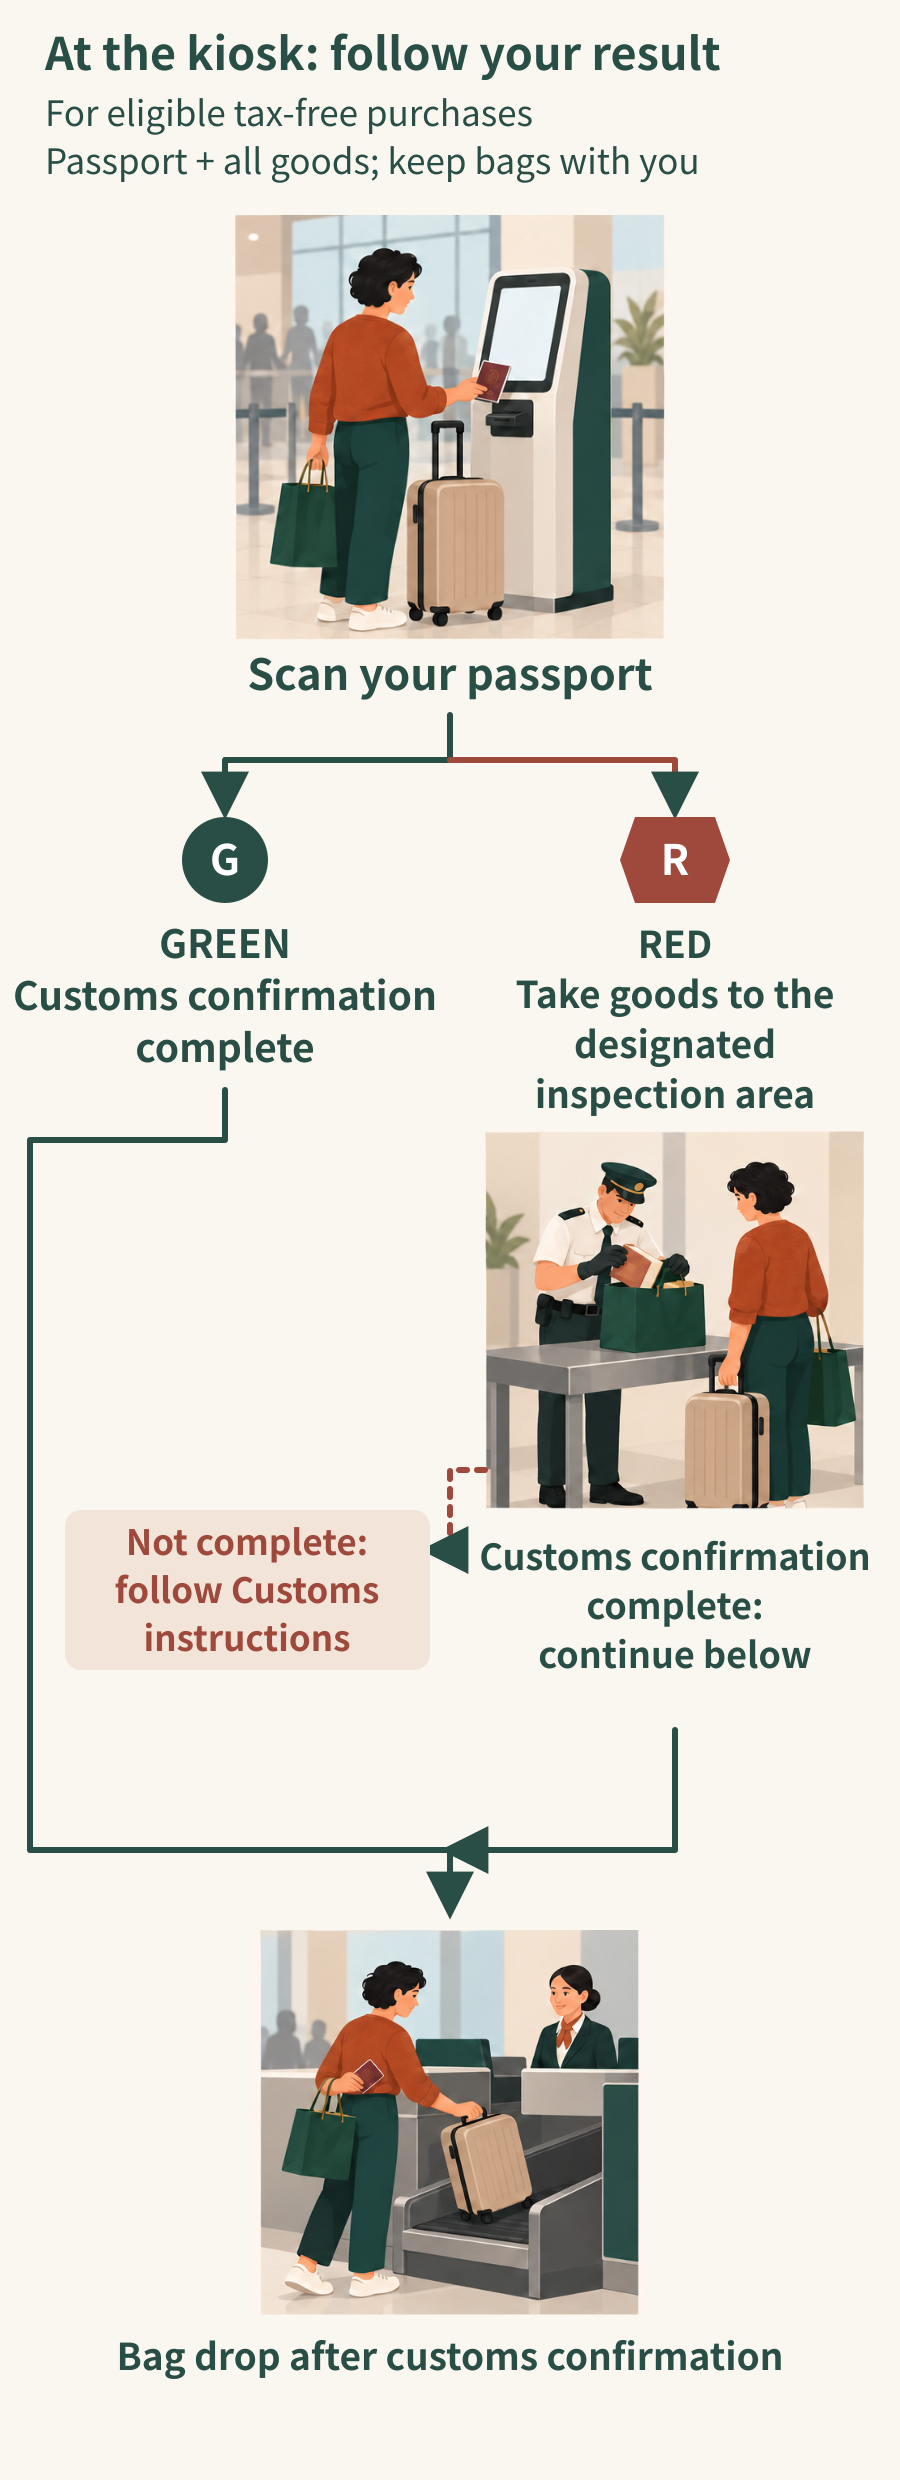
- Keep your passport and all tax-free goods with you, then scan your passport at the tax-free procedure terminal.
- GREEN means customs confirmation is complete. RED means you must take your passport and goods to the designated inspection area and complete the inspection as instructed.
- Finish all required confirmation and inspection before bag drop. Customs completion does not mean the refund has arrived; follow the shop’s refund arrangements.
Using your phone: VJW needs the designated airport Wi-Fi
- Prepare first: create your VJW account and register user information, including passport and landing-permission details. If already registered, you do not need another account. Your passport and goods must still be available for customs verification.
- Connect in the designated area: use the dedicated customs Wi-Fi in the international departure lobby before security. The published SSID is
Customs_WiFi_For_TaxRefund, with passwordjcustoms. Check official signs on site; ordinary airport Wi-Fi or a hotel connection does not replace this requirement. - Open the procedure: sign in to VJW and select “Refund Procedure.”
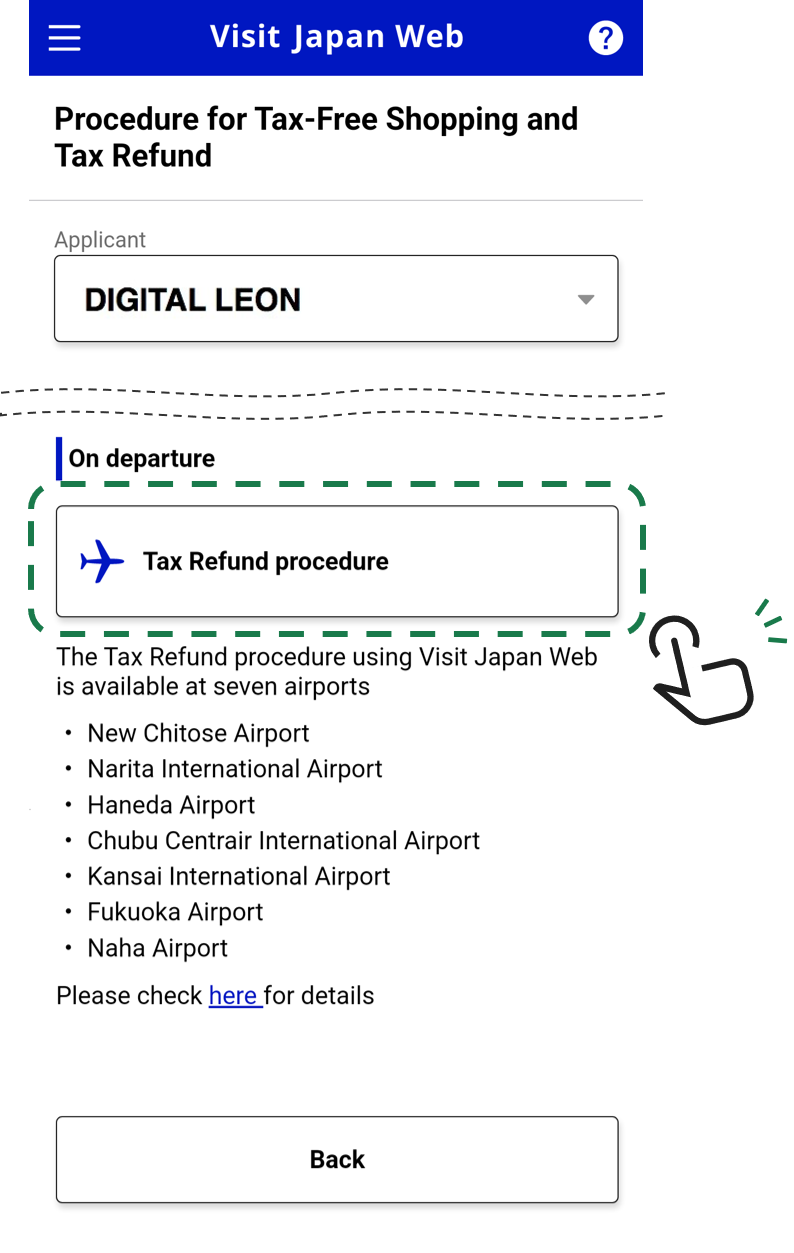
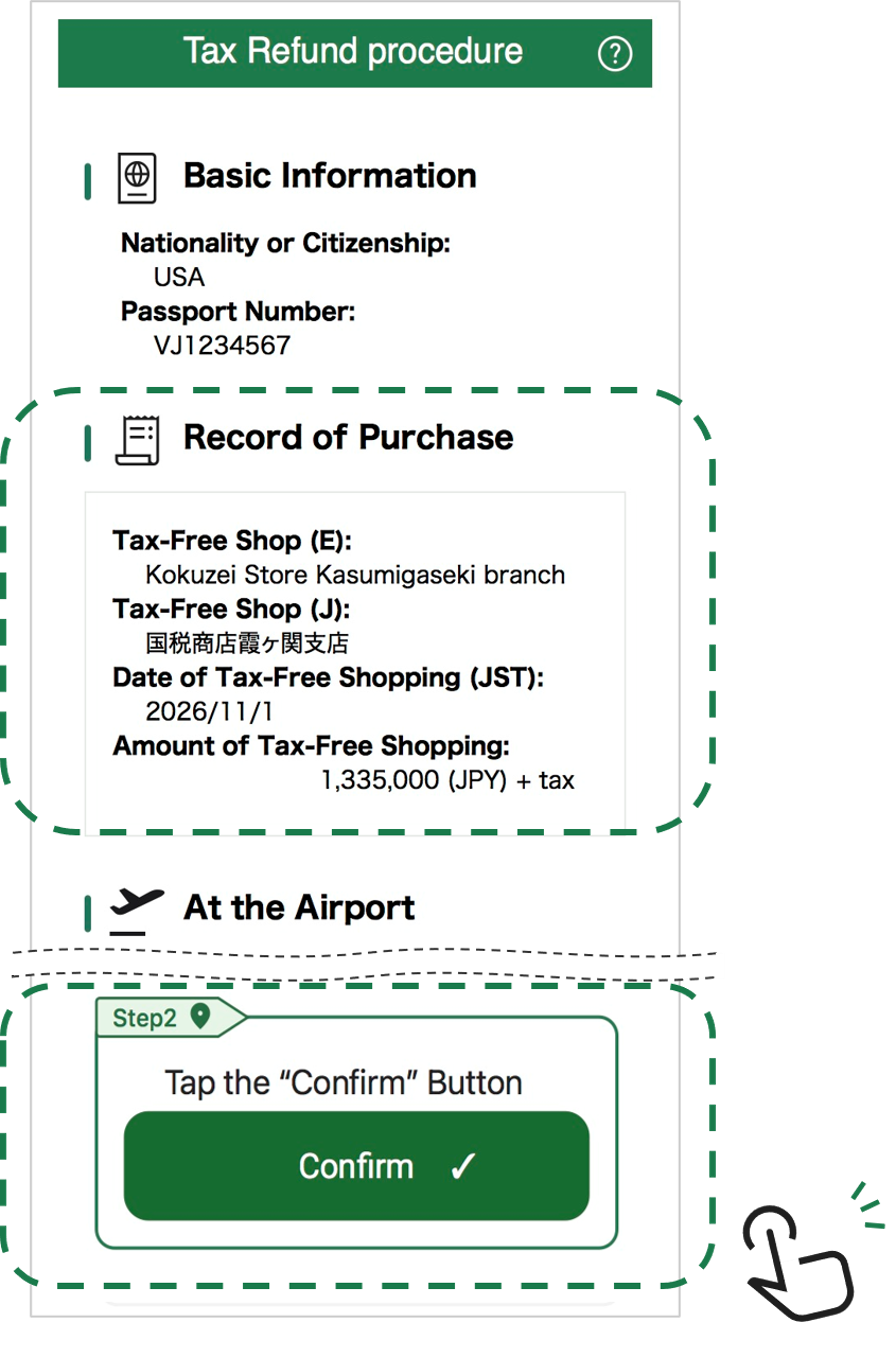
4. Check purchase records: read the records covered by the procedure, then select “Confirm.” This is departure customs confirmation, not airline online check-in. If records are missing, use the missing-record guidance below.
5. Read the result: “Not Completed” means taking your goods and passport to the inspection area. Pressing the button alone is not permission to check the goods in. The status section below explains what to do next.
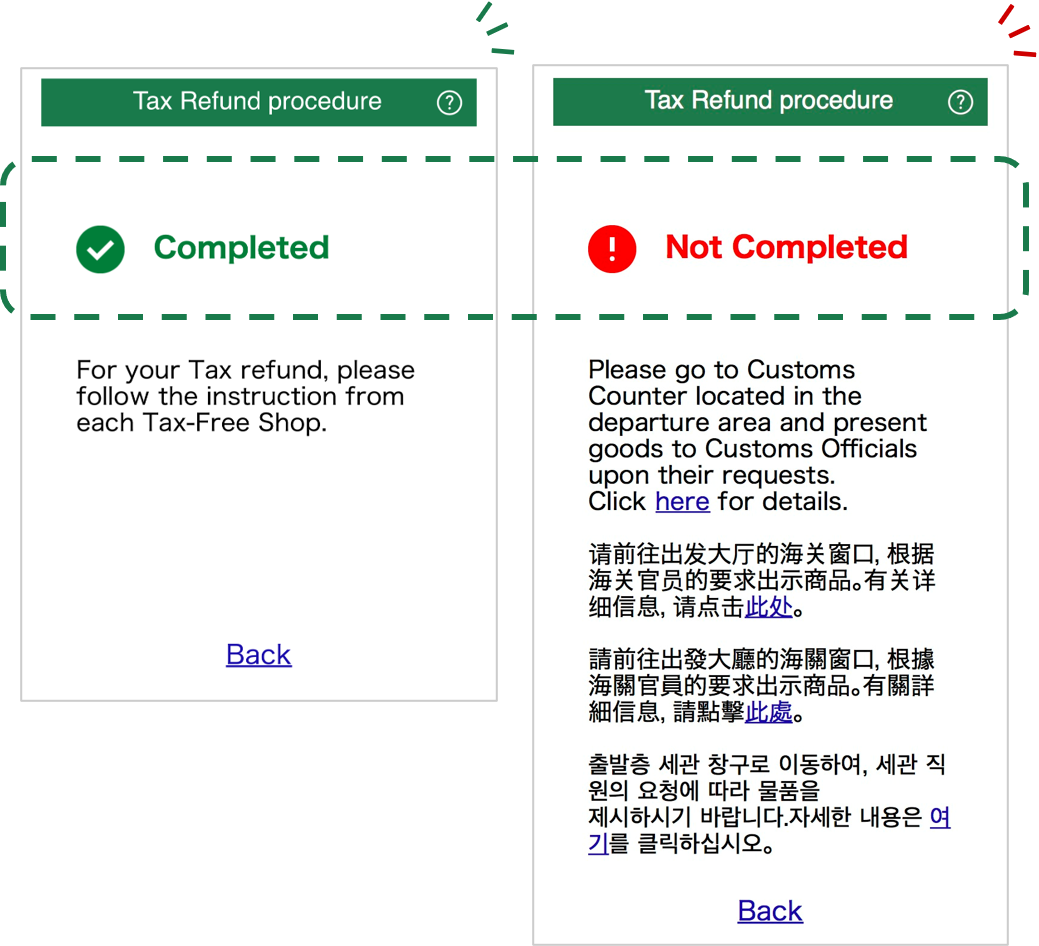
Official guidance is multilingual and some screens include multilingual prompts, but the official FAQ currently describes the online customs procedure interface as English-only. If you cannot use or complete it, use the passport-reading kiosk instead; that route does not require VJW registration.
A missing record does not explain the cause
If you see “No Purchase Records,” check “History” after a passport scan or similar action. Unprocessed records have a 90-day display period. Refresh missing records, then contact the original shop if they remain absent; the shop also handles incorrect information. Not using a Visit Japan Web code at checkout does not itself prevent a record appearing.
Match the status to the next step
- Completed
- Customs confirmation is finished. Follow the shop’s refund instructions; payment may still be outstanding.
- Not Completed
- Go to the designated customs inspection area with the goods.
- Not approved or expired
- The record is ineligible for a refund. Reconnecting to Wi-Fi does not reverse that result.
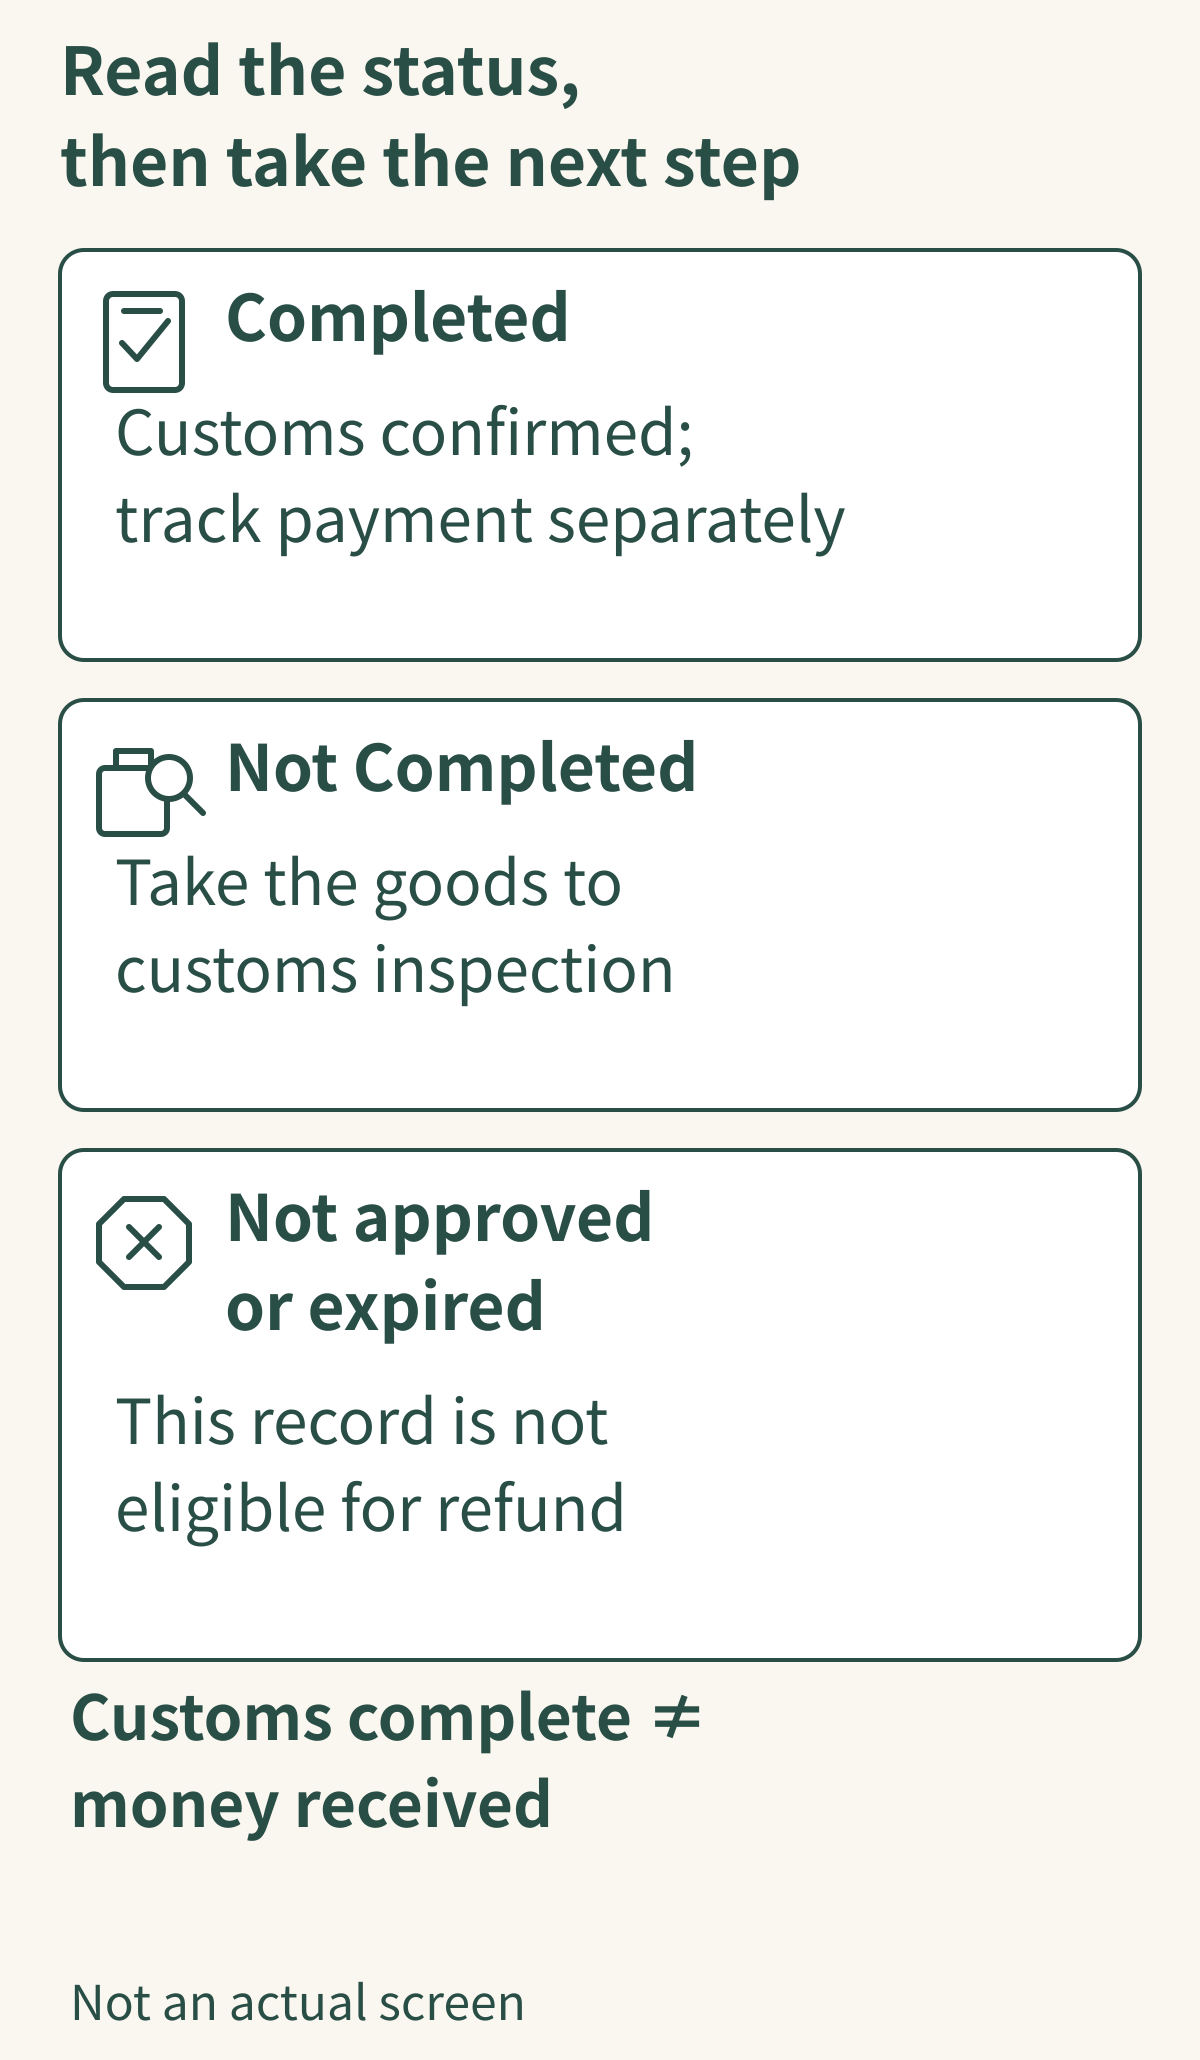
This is not a reproduction of the official operating screen. If a required goods inspection is stopped partway through because of boarding time or another reason, confirmation remains incomplete and no refund is available. Finish the required confirmation and inspection before bag drop; Completed does not mean payment has arrived.
Use the kiosk if the online route is difficult
Follow official error guidance to sign in again and check the dedicated Wi-Fi. If you still cannot proceed, use the passport-reading kiosk. See the VJW steps above for the normal process and conditions.
Choose the right contact
Ask departure customs about terminals, procedure Wi-Fi and goods inspection. Ask the original shop about purchase records or refunds, using its designated contact where provided. As a practical aid, keep the receipt, purchase date, shop details, screen message and refund instructions together.
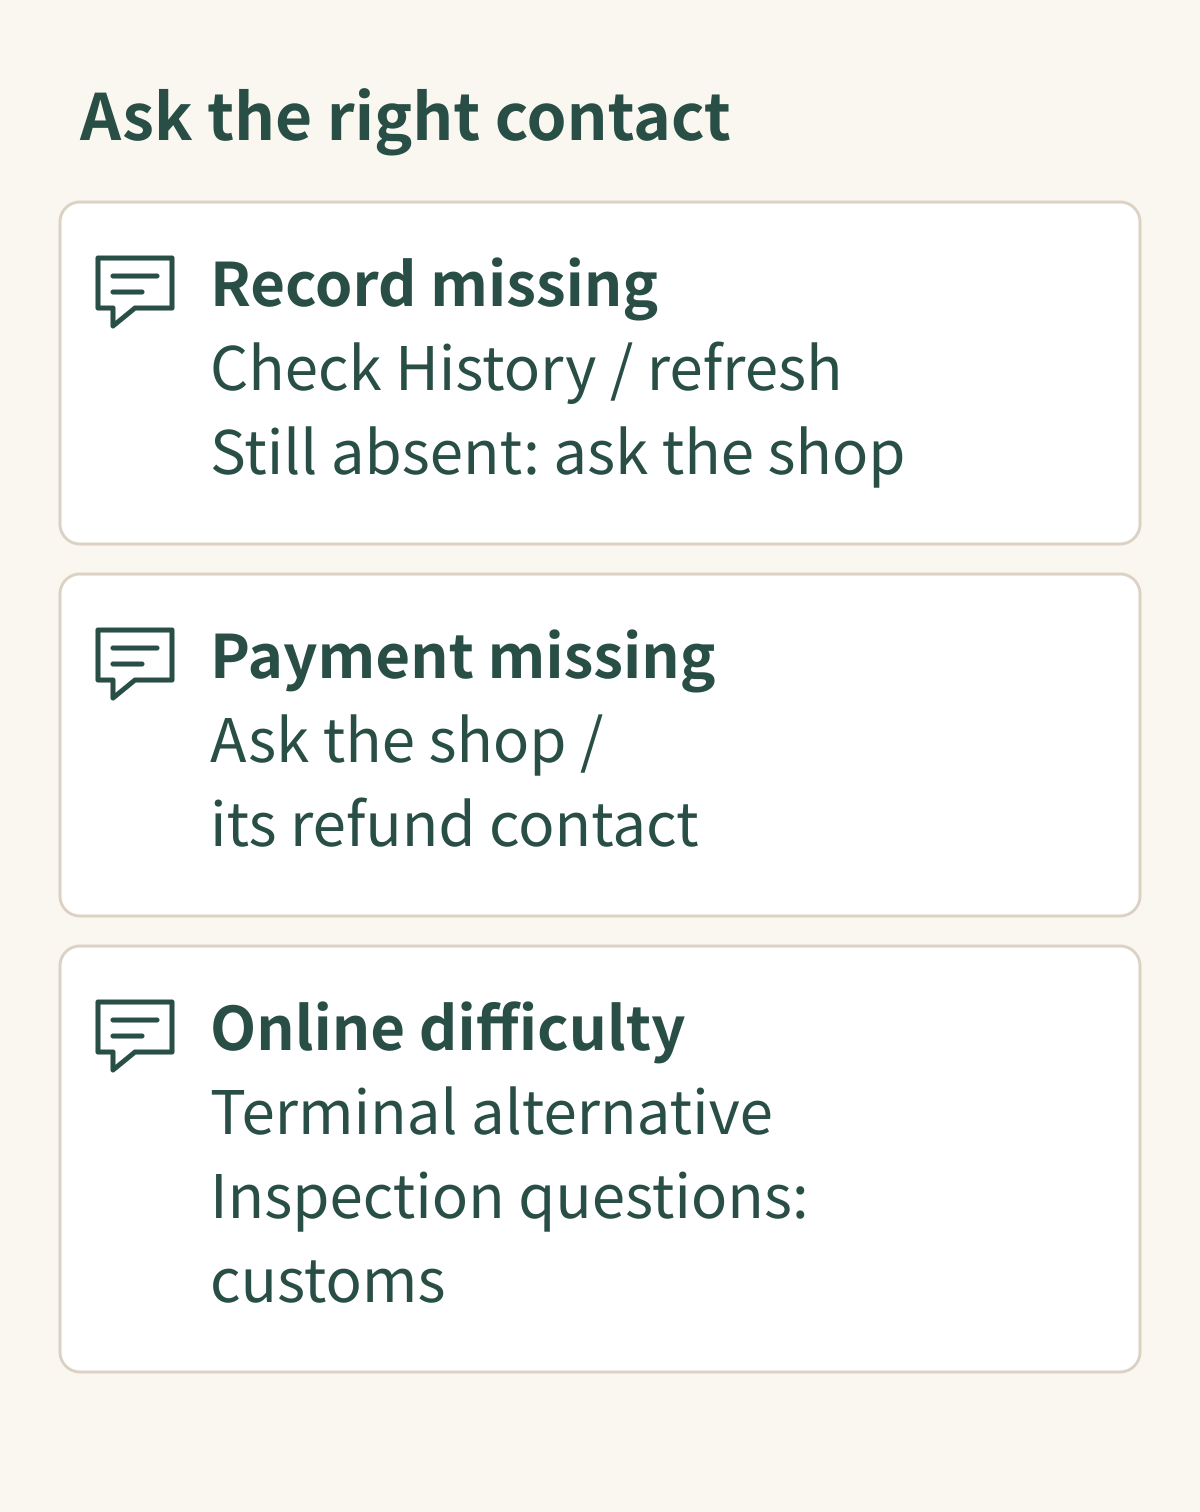
Changing devices does not fix unsubmitted purchase records or consumed goods. Ask the shop about records or refunds, and customs about inspections or on-site operation.
Explain these situations directly
If you have consumed any of the consumables, speak to a customs officer before proceeding; do not continue through either the terminal or the online route yourself. See our medicine and cosmetics usage guide. If your passport was lost and replaced after shopping, use the new passport and also tell customs about purchases made with the old one.
The 90-day customs-confirmation period starts the day after purchase: the official example gives January 30 as the deadline for a November 1 purchase. It is not extra time to complete airport procedures after going home. Allow for queues and possible inspection, not just the passport scan.
Sources
- NTA online customs FAQ: records, status, errors and contacts
- NTA detailed reform guidance: Q32, Q35 and Q36
- Japan Customs program and online procedure overview
- Japan Tourism Agency traveller FAQ
- Japan Tourism Agency departure guidance: bag drop and interrupted inspections
Additional official sources and screen credits
- Japan Customs: airport and seaport maps
- Japan Customs: dedicated Wi-Fi
- Fukuoka Airport: procedure locations
- Centrair: terminal locations
- Haneda Airport: terminal facilities
- National Tax Agency: online procedure guide
- National Tax Agency: reuse conditions
The official images for VJW steps 3, 4 and 5 come from the NTA guide linked above and are reproduced without alteration; accompanying explanations are our own. Reuse follows the NTA’s stated PDL 1.0 conditions. Airport maps are linked to their official originals, not reproduced.